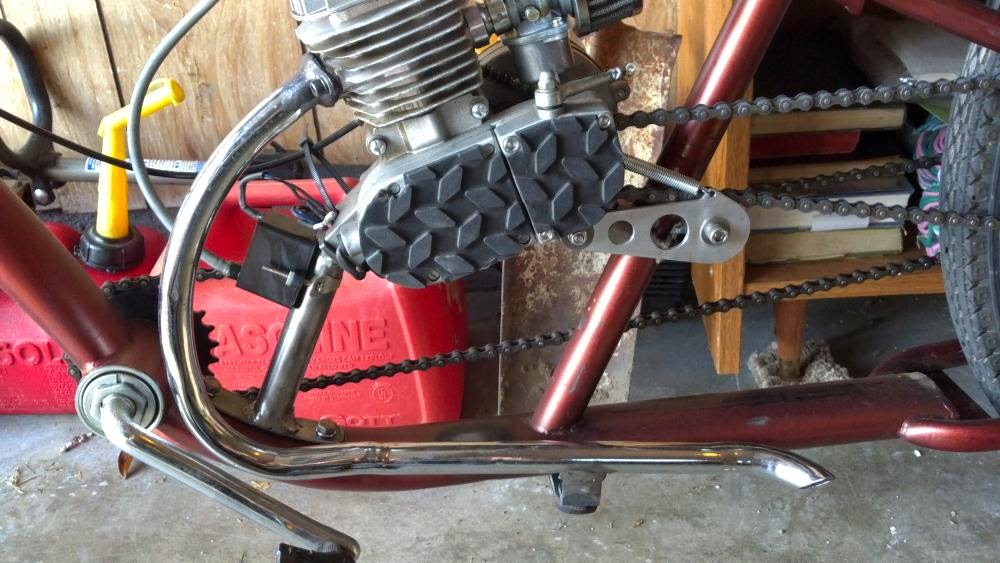
There might be no worse component to a motorized bicycle than the stock chain tensioner. It's so unanimously hated because it always has to be modified in some way to get it to function reliably, whether it be through the use of rubber padding, springs, brackets, etc. It doesn't even come close to working out of the box because you may only get a ride or two before it is loosened by the vibration of the engine.
Mralaska on motoredbikes.com came up with a simple yet elegant solution to this issue: throw it out and adjust the tension with motor mount shims! It makes perfect sense and leaves much less to go wrong. Honestly, I think the tensioner itself is far more dangerous than anything that could possibly happen without even having it.
I plan on trying this with my upcoming build because it just seems so right to me.
All hacks/mods related to bikes that are fitted with Happy Time / China Girl 2-stroke engines!
A warning to those looking to mod their motorized bicycles:
Most, if not all, of the hacks and mods featured on this site were made by individual hobbyists. If you are new to working with 2-stroke bicycle engines, please by aware that there's a possibility that a mod featured on this site could seriously damage your engine. Please don't try any mod from this or any other site unless you fully understand what you are doing. The owner of this blog will not be held responsible for both material and bodily damage caused by performing a modification featured on this blog. Also remember that opening up your engine may void your warranty!
Friday, May 15, 2015
Sunday, February 10, 2013
High quality laser-cut gaskets
I'm getting back into motorized bicycling again, and I recently purchased a new 66cc motor(I jacked up the crank on my last one and I could never get it to run properly again). Since I'm cleaning up my motor before use, I needed replacement gaskets.
Ebay user recapacita772012 is selling high-quality laser cut gaskets for our little bike motors are made of a high-temperature acrylic-nitrile-latex & organic fiber compound that proves to last longer and hold together better than the stock gaskets. And thank god, the intake/exhaust gaskets are cut to the proper size!
Wednesday, June 27, 2012
Saturday, November 26, 2011
Thursday, November 24, 2011
Reverse-engineering the Chinese CDI
There have already been discussions on building a superior CDI, but what about the stock Chinese CDI? While it's rather poor design to begin with, the simplicity and semi-decent functionality make it an attractive electronics project. I don't think that nearly enough is known about the stock CDI, so I think it's great that this topic has come into discussion.
Rohmell on motorbicycling.com(the same Rohmell who made custom CDIs) created a thread about learning more about the stock CDI and possibly building a new one.
Sunday, November 20, 2011
Scooter windshield on a motorized bike
Thursday, November 17, 2011
Sunday, November 13, 2011
Homemade tensioner for single-speed conversion
My adventure into the world of motorized bicycles originally started when the derailler and gearing system on my mountain bike fell off and got destroyed. Since I could no longer practically use the bike for mountain biking or biking around hilly California, I wanted to find a way to bring new life to the bike and avoid tossing it out. That's how I found out about MBs.
Which brings me to my problem now. Since I don't have any sort of tensioning, and since my bike frame has a vertical drop-out, converting my bike to just run as a single-speed hasn't worked out so well. Just the other day, my chain fell off and got gnarled because of my inadequate single-speed conversion. So since then I've been having to push the bike in order to start it.
What I need is a chain tensioner, but not something ridiculously expensive. I thought I'd share this thread from mtbr.com about DIY tensioners.
All I know now is that I'm definitely going to build one of these!
Wednesday, November 9, 2011
Flexi-pipe muffler extension
If you want to extend your stock muffler(or any muffler) to behind your bike without too much expense or welding, that looks like one way to do it! The post doesn't contain any details as to how exactly it was constructed or how leaks are sealed, though.
UPDATE: The original photo was lost so I replaced it with another one that uses flex tube to have an extended muffler. Hopefully this will at least help to illustrate the idea behind the original hack. You can learn more about the muffler extension seen in the photo in this thread.
Friday, November 4, 2011
Break-in secrets
This article on the Mototune USA website describes a somewhat controversial method of breaking in a new engine. The manuals for our engines always tell us to start out with heavy oil(16:1) and break it in easy. This idea is increasingly becoming mythical as many people seem to have better results breaking in an engine by using less oil and using less oil. According to the writer, the most important period in the break-in period is the first 20 miles, and if it's not done right, the piston rings may not seal to their full potential. I'm assuming I understand this correctly.
Read more about breaking in a new engine "properly"!
Make your 2-stroke sound like a Harley
Hondabicycle from motorbicycling.com claims to have an exhaust mod that will make your 2-stroke engine more like a Harley. I'm pretty skeptical, but it's a fairly inexpensive mod. It involves creating an muffler end cap with two baffles and exit holes. The muffler is also packed with fiberglass. If anything, this will at least quiet down your bike if it's loud.
This mod could probably be achieved more easily in combination with my washer end cap mod. Since that has been proven to be an easy and superior end-cap, you could drill two holes in the washer and make your own baffle tubes. Then just JB Weld them in. Let that JB Weld set for a long time before use!
EDIT: Let's be clear that I have never actually tried this, so I have not verified if this mod does what it claims to do.
Sunday, October 30, 2011
Friday, October 28, 2011
BGF engine teardown
Things are kind of slow for now, so if you aren't a regular on MB boards, I thought I'd share an active thread.
Biknut from motorbicycling.com is tired of poorly built HT engines, so he's tearing down a new Boygofast engine to ensure that it's properly put together. Read more to watch him tear apart an HT!
UPDATE: Unfortunately, it seems that many of the images from the original thread are gone. It still may prove useful to read, and pictured above is biknut's ingenious way of pressing the crank out of the engine.
Monday, October 24, 2011
Cleaning up your electrical
If you have come across other pictures of my bike, you'd have seen my electric wires hanging out and simply clamped to the bike with zip ties. These 2-stroke kits pretty much just have the electrical connections hanging out and I really hate that. Also, I chose to zip-tie my CDI instead of using bolts(since it's plastic and apparently breaks easily), but that caused the CDI to move around and the plug wire would often be hanging out the side.
Well recently, some guy was tailgating me and I made a sharp right turn and, well, I wiped out. Got some road rash, but at least I got the opportunity to revise my set up! I wanted something both visually and practically superior, so this is what I came up with:
This post is sponsored by B-12 Chemtool: The world's most powerful paint-thinner!
Well recently, some guy was tailgating me and I made a sharp right turn and, well, I wiped out. Got some road rash, but at least I got the opportunity to revise my set up! I wanted something both visually and practically superior, so this is what I came up with:
- I moved my CDI to the top bar on my frame. That way it won't slide much even if you zip-tie it. For some reason I just think it reduces clutter that way instead of having all the wires smashed up on the one bar on the bottom.
- Shrink tubing: People say to solder the wires and use electrical tape. I decided to go with something nicer looking and less sticky. You can get shrink tubing at Radio Shack or anywhere that sells electronics supplies. Just cut a piece, slide it over the bare area on the wire and roll a soldering iron over it to make the tubing shrink. A heat gun may work well too. It looks great and creates a nice seal to prevent shortage.
- I took all the wires, including the ones coming from the kill switch, and ran them through a piece of flexible cable tube that I cut out. This looks MUCH better than having all the wires visibly hanging out. You can buy cable tubing from Radio Shack or Wal-Mart. Then I just zip-tied the tube to the bottom frame.
- Used silicone sealant on the CDI(where the plug wire comes out) and where the magneto wires come out of the motor. This in combination with the shrink tubing and cable tube should make this setup really water resistant.
This post is sponsored by B-12 Chemtool: The world's most powerful paint-thinner!
Saturday, October 22, 2011
DIY bike repair stand
Thursday, October 20, 2011
A more innovative bike lock
Cable locks and U locks are great but are a bit troublesome to use. It always takes me a minute to wrap my cable lock around my bike frame. Wouldn't it be great to have a system that was lock-n-go?
Apparently you can get what's called a "ring lock" for your bicycle. It securely bolts on to the frame, and all you have to do to lock your bike is turn the key! It does this by locking through your spokes. No fiddling around. I imagine this would be great if you live in a low-crime area or if you just want to park your bike and run into a store(and not have some junior high school student ride away with it). Still keep a cable or U lock for longer term parking, but I like the added peace of mind!
Velo ORANGE sells their own bicycle ring locks for $25 each!
Tuesday, October 18, 2011
Soda can head gasket
Sorry, I don't have any actual photos because the camera I used got jacked up and the photos were lost. :(
You don't need to spend money to replace your head gasket! If the one you have is in mostly okay shape, you can cut your own from an aluminum soda can!
Simply cut a large piece of metal off a soda can. Notice how it still retains the shape of the can? There's an easy way to flatten out the metal; take a clothes iron and iron it as flat as you can. It won't be completely flat, but you can get it flat enough to be useable.
If this doesn't make sense, the first part of this video shows how this is done.
Once you have made a nice piece of flat aluminum, trace your old head gasket on it with a permanent marker. Then simply cut out your new gasket with a razor blade or an exacto knife. Most of it is simple to cut, but the stud holes can be difficult; the key is to try cutting them a little larger than you'd think you'd need.
When you have placed your new head gasket on your engine and placed the head back on, push your bike forward with the clutch engaged to make the piston move. If there are any air leaks, you should hear(and feel) the air come out around part of the head. This is very important to check for because air leaks are very bad for your engine. The first soda can gasket I made had too much cut off from the center and that's where an air leak came from. I did a better job on my second soda can gasket, and so far there are no leaks. If you want, you can use Copper Kote to create a better seal.
Are there any advantages to a soda can head gasket? Other than costing virtually nothing, soda can metal is much thinner than the stock head gaskets, so if you're looking for both a quick fix and less compression, a soda can head gasket might be the way to go.
Sunday, October 16, 2011
Motor-mounted chain tensioner
Subscribe to:
Posts (Atom)